Single sign-on (SSO)
Infracost Cloud supports authenticating with Enterprise SSO providers. It is important that all steps in this page are implemented to ensure users are automatically provisioned based on your SAML user groups, and they can login using your SSO provider.
Step 1: Setup SSO
Assuming you have already purchased Infracost Cloud, you can setup SSO by following these steps. Email support@infracost.io if you would like to enable SSO for proof-of-concept projects where many people are involved.
- Go to Infracost Cloud and sign up with your email and a password. You will delete this user after SSO is enabled.
- From the top dropdown menu, switch to your company organization or create a new organization for your company.
- Follow the applicable sections below to setup SSO, each option ends with you emailing us your SSO details.
Microsoft Entra ID
Click to expand setup instructions
- In the Infracost Cloud
dashboard go to
Org Settingsand copy yourOrg ID. You will need to provide this to Infracost in a future step. - Login to the Azure portal
- Go to
Microsoft Entra ID > Enterprise applications - Click
New application - Click
Create your own application - For the name enter
Infracost Cloud - Make sure 'Integrate any other application you don't find in the gallery (Non-gallery)' is selected.
- On the left select
Single sign-onand selectSAML - Click
Editin the Basic SAML Configuration section. - Click
Add identifierand enterurn:auth0:infracost:YOUR_INFRACOST_ORG_ID - Click
Add reply URLand enterhttps://login.infracost.io/login/callback?connection=YOUR_INFRACOST_ORG_ID - Click
Save - Download 'Certificate (Base64)'. You will need to provide this to Infracost.
- Copy the 'Login URL'. You will need to provide this to Infracost in the next step.
Okta
Click to expand setup instructions
- In the Infracost Cloud
dashboard go to
Org Settingsand copy yourOrg ID. You will need to provide this to Infracost in a future step. - Login to the Okta Admin dashboard
- Go to
Applications > Applications - Click
Create App Integration - Select
SAML 2.0and click Next. - For the App name enter
Infracost Cloudand click Next. For Single sign on URL enter
https://login.infracost.io/login/callback?connection=YOUR_INFRACOST_ORG_ID- For the Audience URL (SP Entity ID) enter
urn:auth0:infracost:YOUR_INFRACOST_ORG_ID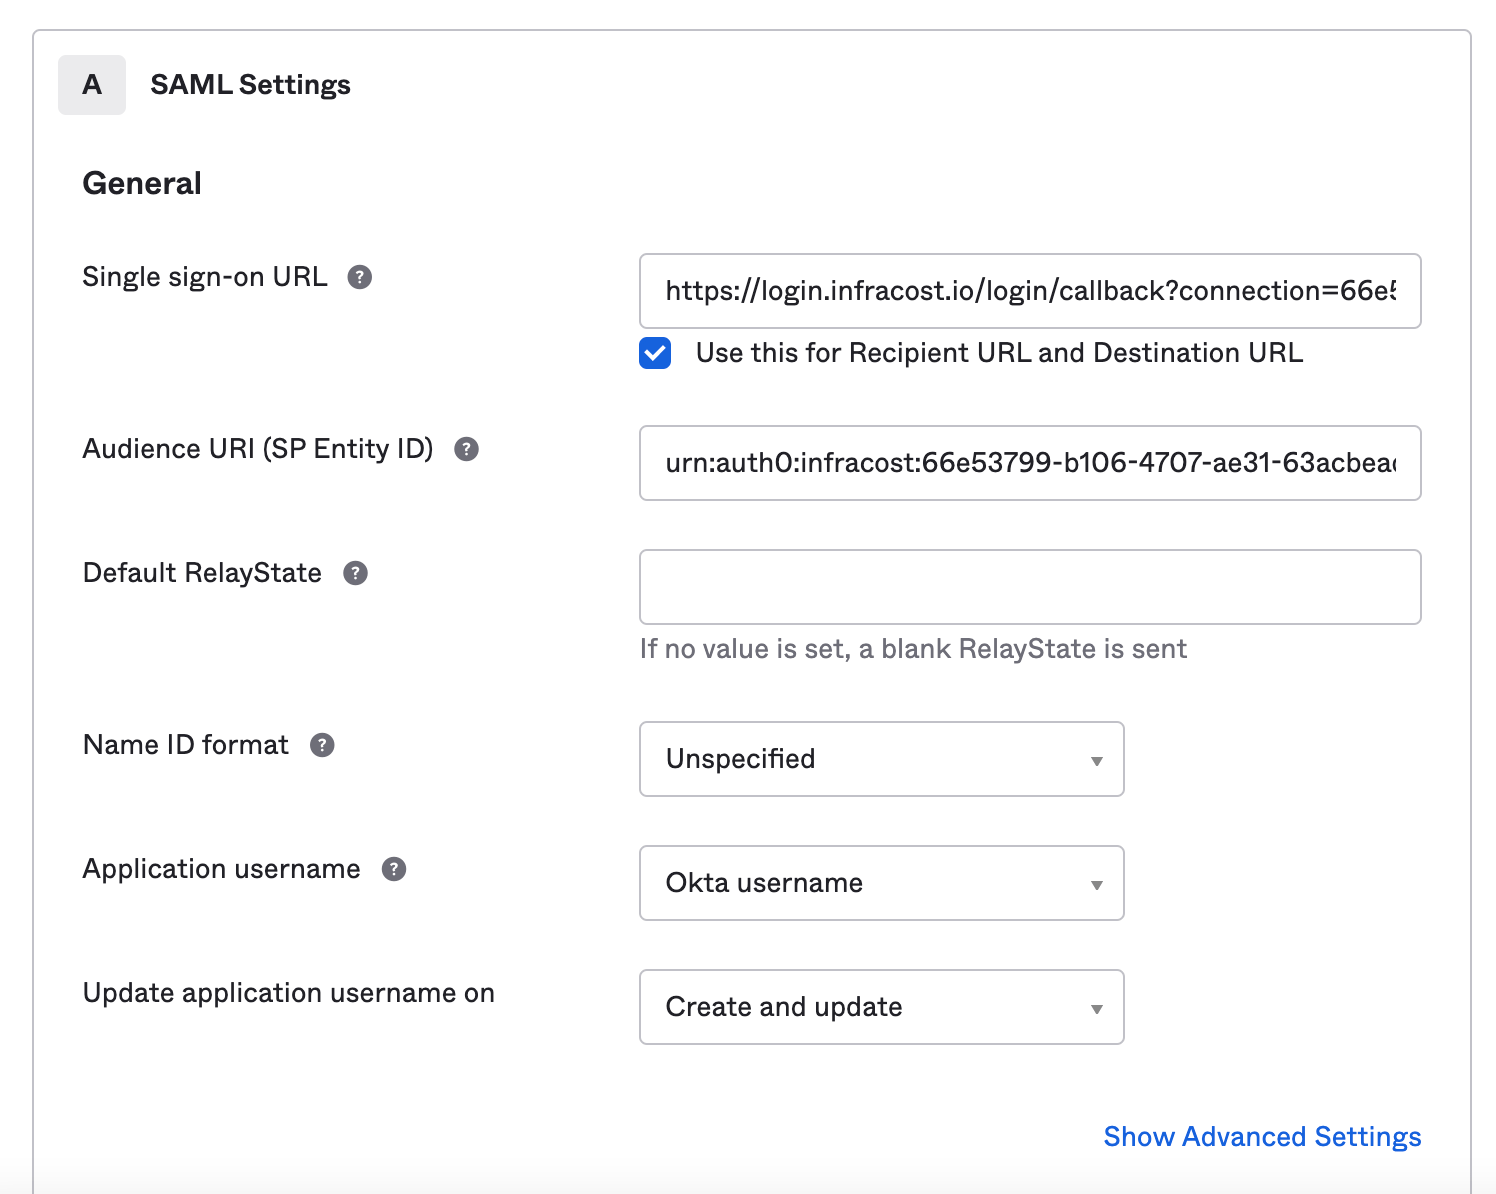
- Add the following for the
Attribute Statementssection and clickNext.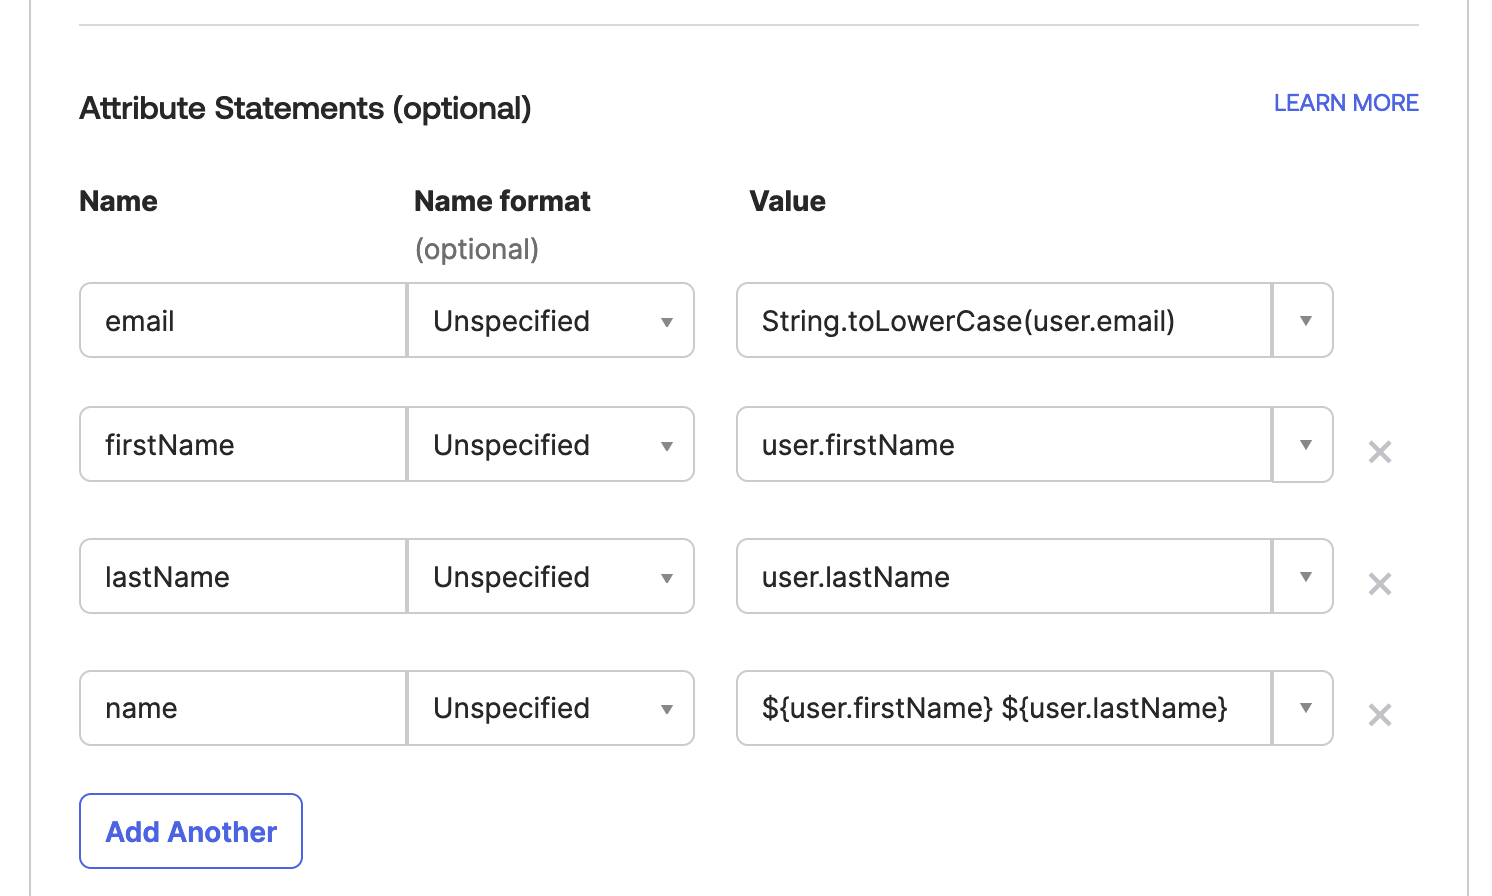
- Choose
I'm an Okta customer adding an internal appand clickFinish - In the
Sign ontab, scroll down to theSAML Signing Certificatessection. On the right-hand side click the button toView SAML setup instructions. - Copy the
Identity Provider Single Sign-On URLand download the certificate. - In the Okta Admin dashboard assign any users to the Infracost Cloud app. You can also add an Infracost button or icon to your SSO portal as we support IdP-Initiated logins from Okta too, save the following image to use for that:
Google Workspace
Click to expand setup instructions
- In the Infracost Cloud
dashboard go to
Org Settingsand copy yourOrg ID. You will need this when setting up the SAML app in Google Workspace. - Login to Google Workspace admin
- Go to
Apps > Web and mobile apps - Click
Add app > Add custom SAML app - For the App name enter
Infracost Cloud - Copy the SSO URL and download the Certificate. You will need to supply these to Infracost in a future step. Click Continue.
- In the ACS URL enter:
https://login.infracost.io/login/callback?connection=YOUR_INFRACOST_ORG_ID - In the Entity ID enter:
urn:auth0:infracost:YOUR_INFRACOST_ORG_ID - Tick
Signed response - For Name ID format choose
UNSPECIFIEDand for Name ID chooseBasic Information > Primary email. The form should look like the following: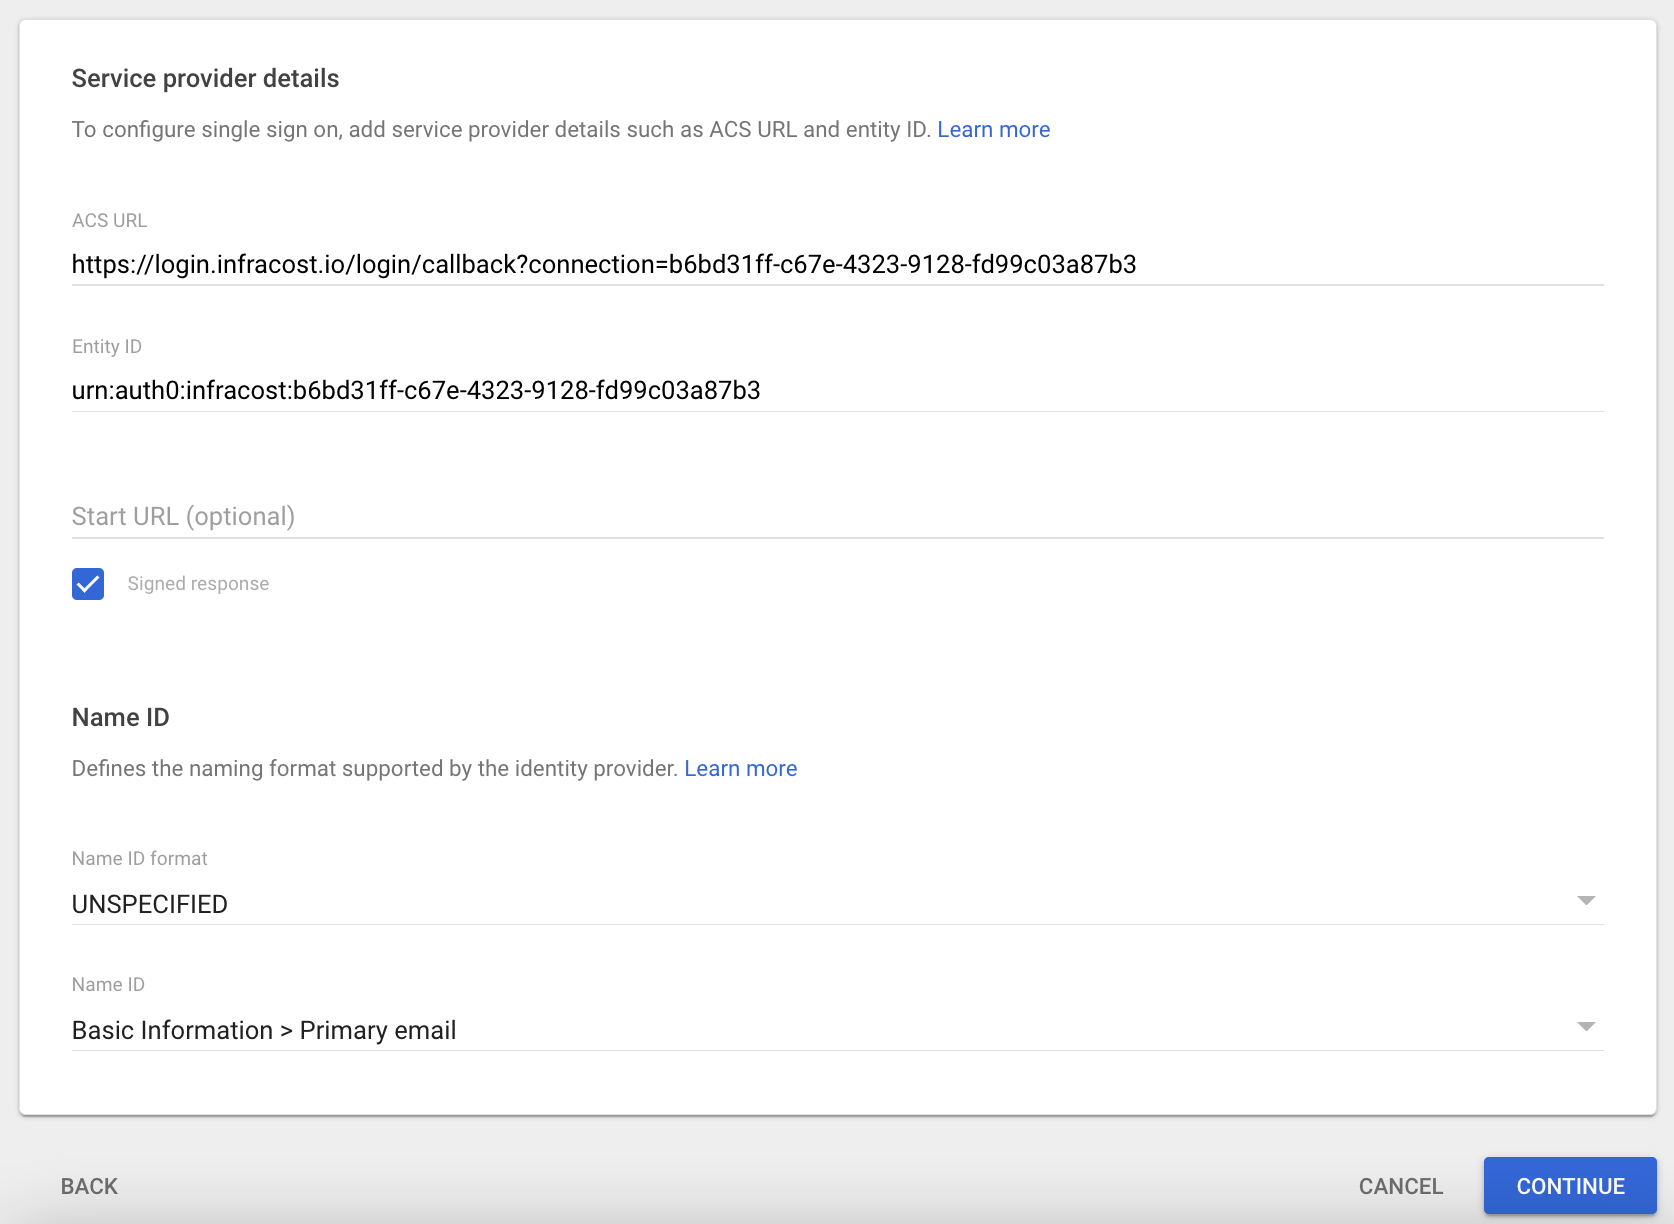
- Click Continue
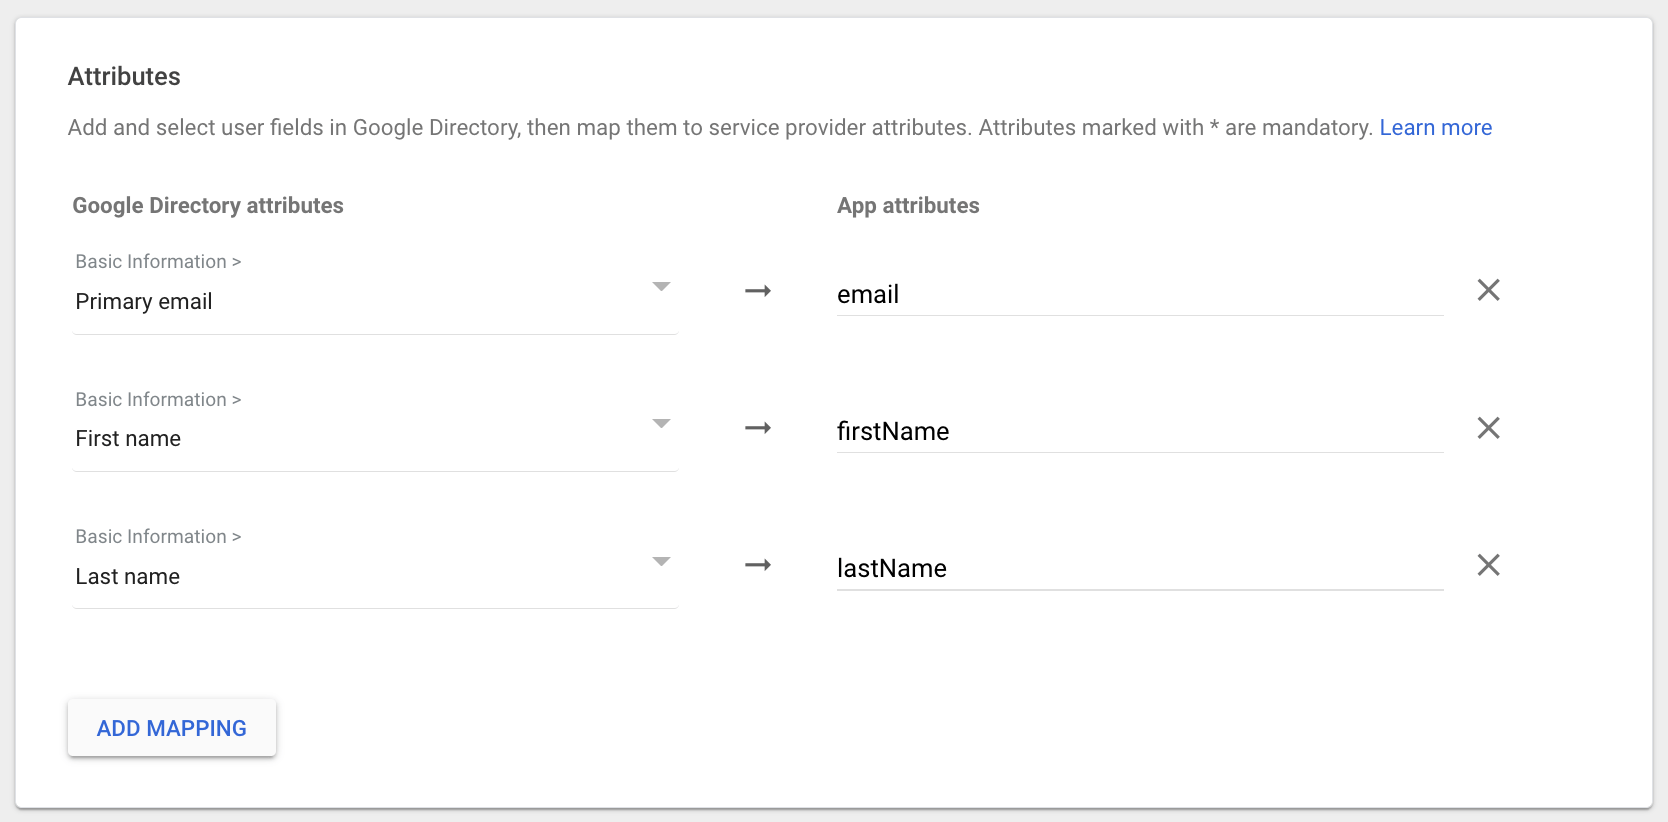
- Add the following Attributes and click Finish:
SSO login notes
After SSO is configured:
- SSO is enabled on your company domain name(s), such as
acme-inc.com. So anyone who enters an email address that contains your company domain names in the Infracost log in page will be redirected to your SSO provider for authentication. - Once SSO is enabled, it becomes the only login method for your organization. Users removed from your SSO system will automatically lose access to Infracost Cloud.
- You can invite users to your Infracost Cloud organization from the
Org Settings > Memberspage. They will also need to be added to the corresponding group in your SSO provider so they can login. - If a user had already logged-in prior to SSO being enabled, on their first login after SSO is enabled, they will be asked to confirm if they want to link their login accounts. They must click
Continuedo this to be able to access your company's Infracost Cloud organization, otherwise a new empty organization will be created for them. If they skip this step, email support@infracost.io so we can assist you.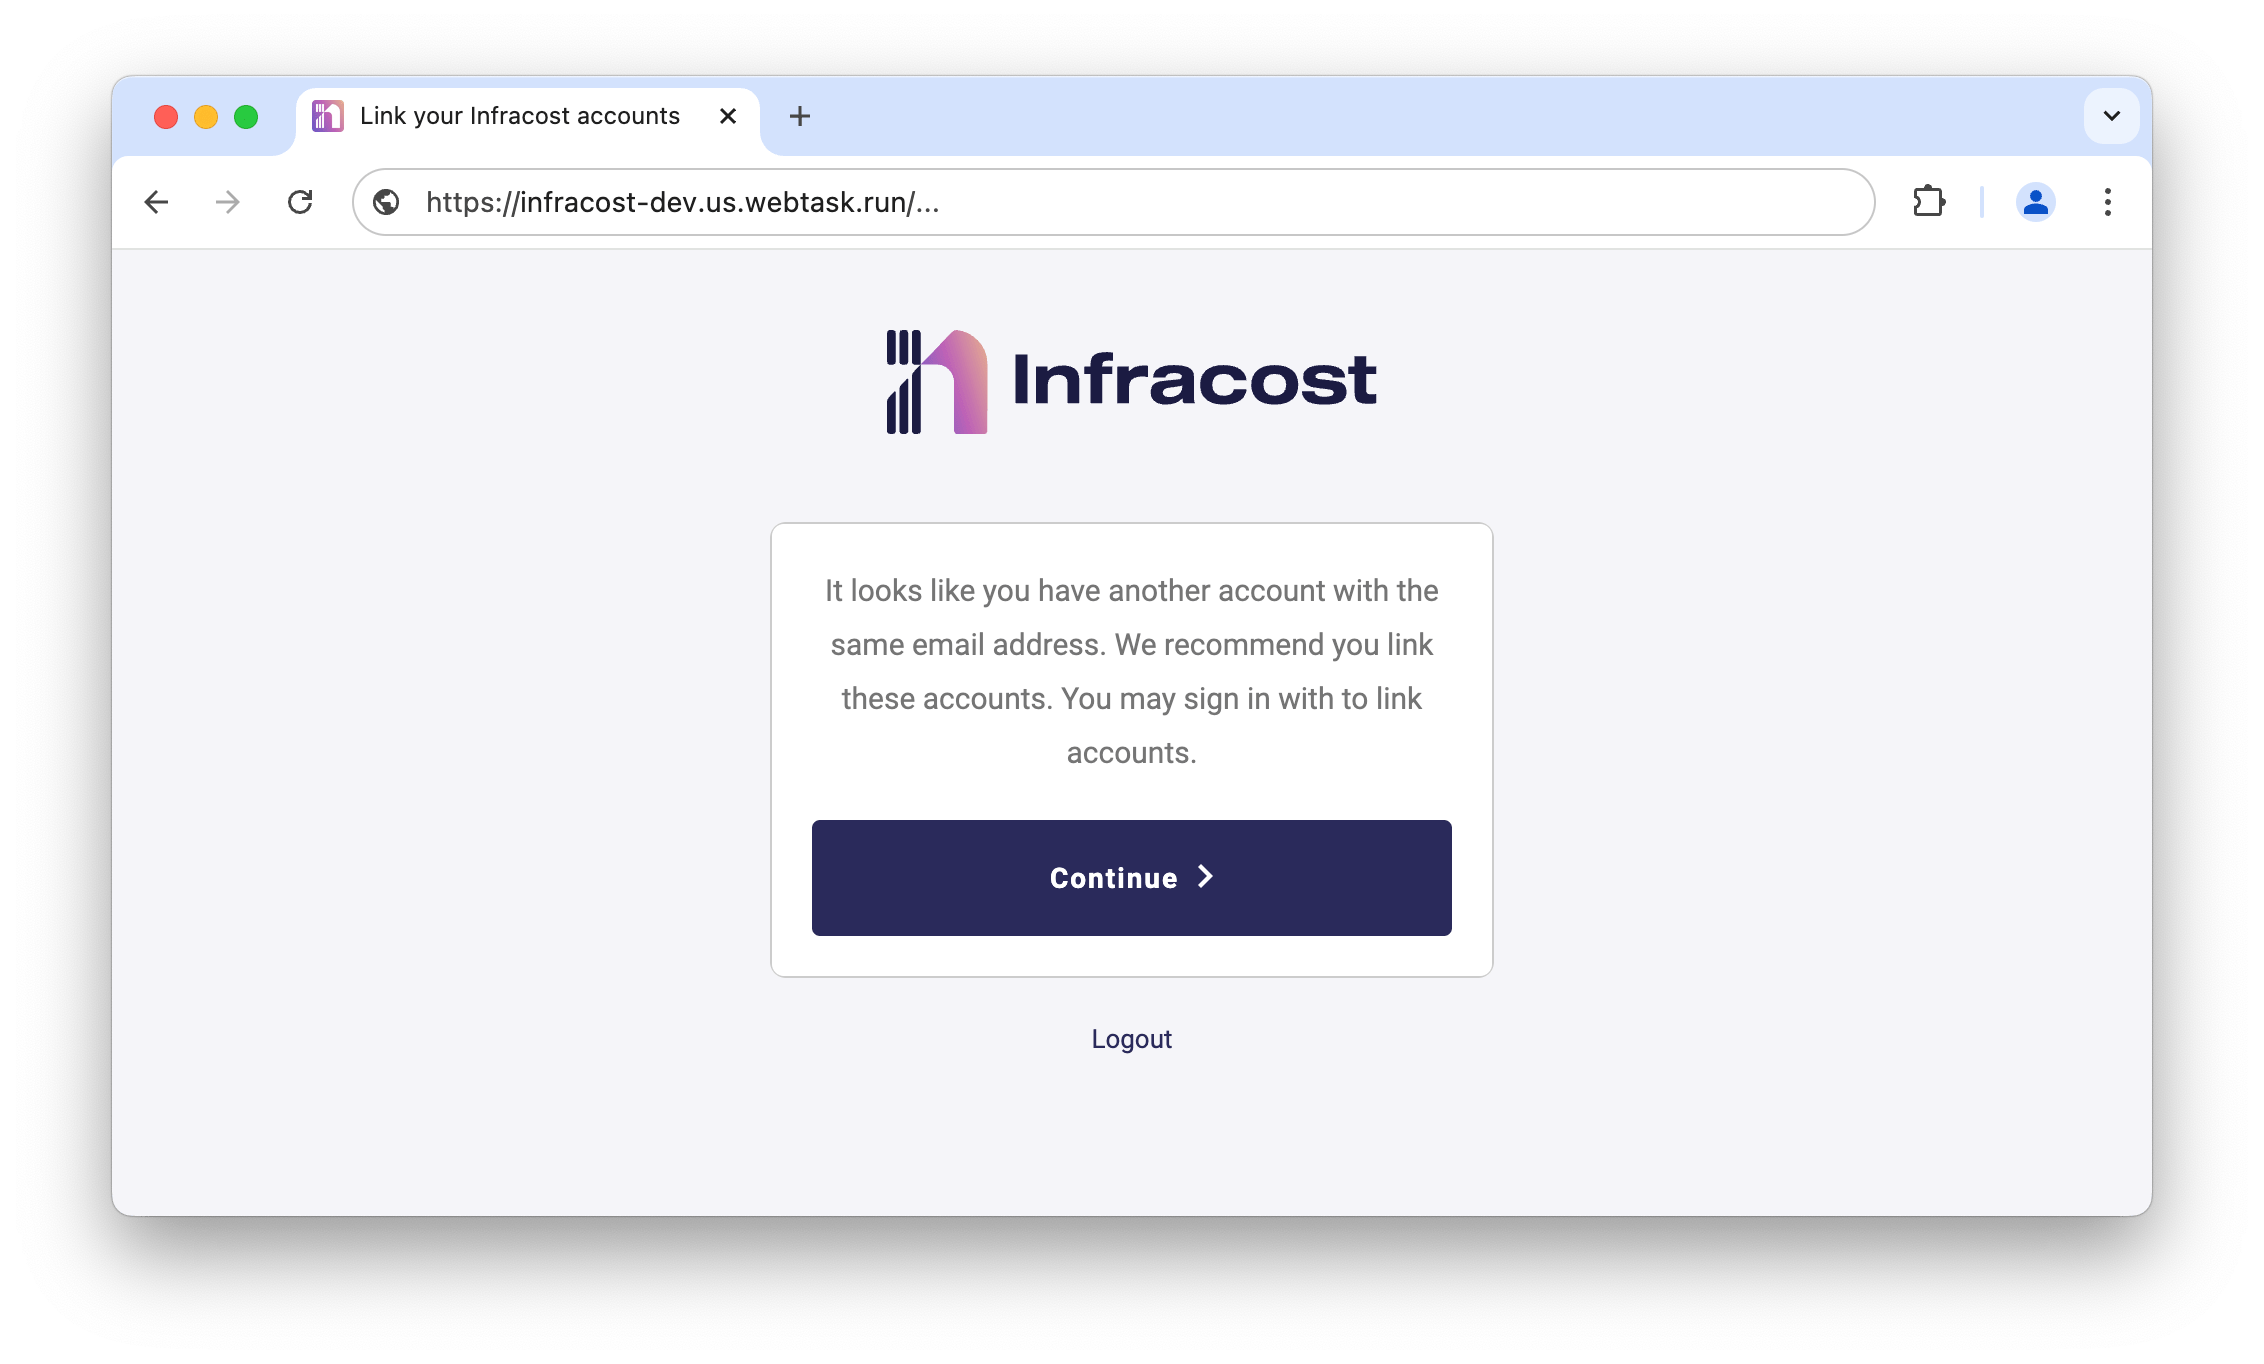
- For organizations using Okta: If users see the error "User is not assigned to this application" when signing in, it means they need to be added to the Okta Infracost app.
Step 2: SAML group mapping
Infracost uses SAML to provision users automatically based on your user groups. This allows you to manage access to Infracost Cloud by managing SAML groups in your SAML provider, instead of inviting users individually to your Infracost Cloud account. With SAML groups, users are automatically provisioned when they sign-in for the first time; their roles are updated every time they sign-in.
To enable this feature you should:
- Create SAML user groups in your SAML provider and put users in those groups. Infracost supports four roles (
Viewer,Editor,Admin,Owner); we recommend two user groups to start with:Ownerfor people who manage Infracost, andViewerfor all engineers.
If you already have a SAML group that most engineers are part of (e.g. for GitHub), you should re-use that for the Infracost Viewer role. This enables them to see their repo's pre-existing issues and fix them.
Users that are part of multiple groups will get the highest role from their group. For example, if a user is part of the InfracostViewer and InfracostEditor groups, they'll get the Editor role.
If you have multiple organizations under an Infracost enterprise, the SAML groups can also be treated as global roles that span all orgs in the enterprise. For example, your engineering user group can be given the Viewer role, and your central FinOps team can be given the Owner role in all organizations that are part of your enterprise.
After enabling SAML, you can send us a custom support URL or email address. This will be shown to users who sign in with SSO but aren't part of your SAML user groups. It helps guide these users on how to follow your company's process to join the correct SAML group and access Infracost Cloud.
-
Configure group claims in your SAML provider: The SAML assertion must include the relevant groups that the user belongs to, and it must be the group names that are sent, not the group IDs. The group claim field typically has one of these names:
groupsrolesmemberOfhttp://schemas.microsoft.com/ws/2008/06/identity/claims/groupshttp://schemas.microsoft.com/ws/2008/06/identity/claims/role
Note the exact field name you configure as you'll need to provide this to Infracost in the next step.
Microsoft Entra ID
Click to expand configuration instructions
For Microsoft Entra ID, follow the Emit cloud-only group display name in token section in the Microsoft documentation. Specifically:
- Set the Group Claims to 'Groups assigned to the application'
- Set the Source Attribute to 'Cloud-only group display names'
Okta
Click to expand configuration instructions
For Okta, follow the How to pass a user's group membership in a SAML Assertion from Okta article in the Okta documentation to configure group membership passing in your SAML assertions.
Step 3: Email us key setup information
- Email us the following information:
Email template
Click to expand email template
To: support@infracost.io

Subject: Enable SSO & SAML

Body:


Please enable SSO & SAML groups for our organization.
- Company name or Infracost Org ID: xxx
- SSO service provider: [Microsoft Entra ID, Okta, Google Workspace, Other SAML Provider]
- Identity Provider Single Sign-On URL: xxx
- SSO domains (comma separated list of domains to enable for this SSO connection): xxx
- The public certificate is attached: **Don't forget to attach it ;) **
- SAML group role mapping:
| SAML group name | Infracost Org slug | Infracost role |
|-----------------|--------------------|----------------|
| AllEngineers | my_org | Org Viewer |
| InfracostEditor | my_org | Org Editor |
| InfracostAdmin | my_org | Org Admin |
| InfracostOwner | all orgs | Org Owner | - SAML Assertion Group attribute: [This typically has one of these names:
groups,roles,memberOf,http://schemas.microsoft.com/ws/2008/06/identity/claims/groups, orhttp://schemas.microsoft.com/ws/2008/06/identity/claims/role] - If possible, an example of the SAML assertion that will be sent.
- How I'd like this enabled (Select one):
A. Let's schedule a 10 minute screenshare to test and enable together for the fastest setup. Here are a few convenient times: XXX
B. Enable initial SSO to test, but continue to allow existing login methods while we confirm everything is working
C. Fully enable now, then let me know it's ready to test (WARNING: If there's a misconfiguration in your settings, it could lock your users out temporarily)
Thanks!
- Once we receive your email, we will enable the SAML groups and reply back to you so you can verify that users are automatically provisioned correctly.
Org Admins and Owners will still be able to delete users from Infracost Cloud to cleanup old users from the Org Settings > Members page. However, if those users login again, their users will be auto-provisioned again. If users are removed from your SSO system, or SAML groups, they will not be able to login.
- In Infracost Cloud, go to
Settings > Org Settings > Custom Support, and add an email address or a link to your internal wiki or chat channel. This should explain how team members can request access.
This message will appear to anyone who signs in with SSO but isn’t part of your SAML groups — so they won’t get access until you add them to the right group on your side.