Get started
Infracost shifts cloud costs left—into your engineering workflow. It helps you write cost-aware infrastructure (Terraform, CloudFormation, AWS CDK) across AWS, Azure, and Google Cloud. Catch cost issues in pull requests before deployment, and apply fixes by merging a single PR.
If you run into any issues, join our community Slack and we'll help you quickly 😄
1. Install the CLI
Get started with the CLI first. This will help you both build cost-aware infrastructure as well as fix FinOps issues within your IaC files.
- macOS
- Windows
- Linux
brew install infracost

infracost --version # Should show 2.5.2
To upgrade Infracost, run brew upgrade infracost.
choco install infracost

infracost --version # Should show 2.5.2
To upgrade Infracost, run choco upgrade infracost.
Alternatively, download and unzip the latest release. Run it from the Command Prompt or Powershell using .\infracost.exe alongside other required commands/flags. You should also move the exe file to a folder that is in your PATH environment variable, e.g. C:\Windows.
The easiest way is to use our install script:
# Downloads the CLI based on your OS/arch and puts it in /usr/local/bin
curl -fsSL https://raw.githubusercontent.com/infracost/cli/master/scripts/install.sh | sh
Or you can install it manually:
- Download the archive for your platform from our releases.
- Unarchive and copy it to one of the directories in your
$PATH, e.g./usr/local/bin:
tar xzf infracost-linux-amd64.tar.gz -C /tmp
mv /tmp/infracost-linux-amd64 /usr/local/bin/infracost
- Check that it works correctly:
infracost --version # Should show 2.5.2
2. Get API key
This is the fastest way to get the full Infracost Dev experience. It walks you through getting a free API key, installing the right IDE extension, registering AI agent skills, and wiring up CI/CD — all from one command.
infracost setup
- No cloud credentials or secrets are sent to the API.
- Infracost does not make any changes to your IaC state or cloud resources.
3. See your first cost estimate
Infracost parses the project locally to determine resource types and quantities needed to calculate costs.
# You can also: git clone https://github.com/infracost/example-iac
cd my-terraform-project
Open any Terraform, CloudFormation, or CDK project (or clone our example) and try one of the following:
AI Agent
Give your AI coding agent real-time access to cloud pricing and your organization's FinOps policies. Instead of generating infrastructure that needs a separate review cycle, an agent equipped with Infracost skills can scan existing IaC for cost and tagging violations, optimize resources to fit a budget, and generate compliant infrastructure on the first attempt.
The install steps are only necessary if you didn't allow infracost setup to configure your AI coding agent, if you are enabling it for agents that are not supported by infracost setup, or if you prefer to configure things yourself.
- Claude Code
- GitHub Copilot
- OpenAI Codex
- Cursor
- Gemini CLI
Installing the Infracost Agent Skills for Claude
Ensure you have the Claude Code CLI installed. Then from your terminal, run the following two commands to add the Infracost marketplace and install the plugin:
claude plugin marketplace add infracost/agent-skills
claude plugin install infracost@infracost
Then quit and restart Claude Code for the changes to take effect.
On your next IaC task, the skill will prompt you to install any required dependencies (including the Infracost CLI) and authenticate with your Infracost account if needed. Your API key is configured automatically during that flow.
Once installed, skills are available as /infracost:<skill> slash commands, and are also invoked automatically when you ask relevant questions about your infrastructure.
Using the skill
Use natural prompts to get cost estimates:
Give me a full cost breakdown of this project and highlight the most expensive resources.
After you've set up your tagging policy, you can ask the agent to fix violations:
Scan this project and fix all tagging violations.
You can also generate new IaC that is automatically compliant with any selected FinOps policies (e.g. preferred regions and instance types), tagging policies, and budget constraints:
Create a 3-tier web app on AWS using ECS and Postgres that costs less than $400/month and is compliant with all of my organization's FinOps policies.
See the AI Agent Skills page for the full list of available skills and detailed usage examples.
Installing the Infracost Agent Skills for Copilot
Copilot CLI
- Add the Infracost marketplace and install the plugin:
copilot plugin marketplace add infracost/agent-skillscopilot plugin install infracost@infracost
- In VS Code, open the Command Palette (
⌘⇧Pon macOS,Ctrl+Shift+Pon Windows/Linux). - Run Chat: Install Plugin From Source.
- Enter
https://github.com/infracost/agent-skillsas the repo. - Quit and re-open VS Code for the changes to take effect.
On your next IaC task, the skill will prompt you to install any required dependencies (including the Infracost CLI) and authenticate with your Infracost account if needed. Your API key is configured automatically during that flow.
Using the skill
Use natural prompts to get cost estimates:
Give me a full cost breakdown of this project and highlight the most expensive resources.
After you've set up your tagging policy, you can ask the agent to fix violations:
Scan this project and fix all tagging violations.
You can also generate new IaC that is automatically compliant with any selected FinOps policies (e.g. preferred regions and instance types), tagging policies, and budget constraints:
Create a 3-tier web app on AWS using ECS and Postgres that costs less than $400/month and is compliant with all of my organization's FinOps policies.
See the AI Agent Skills page for the full list of available skills and detailed usage examples.
Installing the Infracost Agent Skills for Codex
Type the following in a Codex prompt:
$skill-installer infracost/agent-skills
Codex expects a single skill by default. Because infracost/agent-skills defines multiple skills, Codex may respond saying this isn't a single skill. If that happens, tell it to install all the skills in the repo and it will resolve the rest automatically.
Using the skill
Use natural prompts to get cost estimates:
Give me a full cost breakdown of this project and highlight the most expensive resources.
After you've set up your tagging policy, you can ask the agent to fix violations:
Scan this project and fix all tagging violations.
You can also generate new IaC that is automatically compliant with any selected FinOps policies (e.g. preferred regions and instance types), tagging policies, and budget constraints:
Create a 3-tier web app on AWS using ECS and Postgres that costs less than $400/month and is compliant with all of my organization's FinOps policies.
See the AI Agent Skills page for the full list of available skills and detailed usage examples.
Installing the Infracost Agent Skills for Cursor
- Open Cursor Settings → Rules.
- In the Rules section, click +New button.
- Select Add from GitHub/GitLab.
- Enter
https://github.com/infracost/agent-skills.gitas the repository URL.
Using the skill
Use natural prompts to get cost estimates:
Give me a full cost breakdown of this project and highlight the most expensive resources.
After you've set up your tagging policy, you can ask the agent to fix violations:
Scan this project and fix all tagging violations.
You can also generate new IaC that is automatically compliant with any selected FinOps policies (e.g. preferred regions and instance types), tagging policies, and budget constraints:
Create a 3-tier web app on AWS using ECS and Postgres that costs less than $400/month and is compliant with all of my organization's FinOps policies.
See the AI Agent Skills page for the full list of available skills and detailed usage examples.
Installing the Infracost Agent Skills for Gemini
Ensure you have the Gemini CLI installed. Then from your terminal, run the following to install the skills:
gemini skills install https://github.com/infracost/agent-skills.git
On your next IaC task, the skill will prompt you to install any required dependencies (including the Infracost CLI) and authenticate with your Infracost account if needed. Your API key is configured automatically during that flow.
Once installed, skills are available as /infracost slash commands, and are also invoked automatically when you ask relevant questions about your infrastructure.
Using the skill
Use natural prompts to get cost estimates:
Give me a full cost breakdown of this project and highlight the most expensive resources.
After you've set up your tagging policy, you can ask the agent to fix violations:
Scan this project and fix all tagging violations.
You can also generate new IaC that is automatically compliant with any selected FinOps policies (e.g. preferred regions and instance types), tagging policies, and budget constraints:
Create a 3-tier web app on AWS using ECS and Postgres that costs less than $400/month and is compliant with all of my organization's FinOps policies.
See the AI Agent Skills page for the full list of available skills and detailed usage examples.
IDE
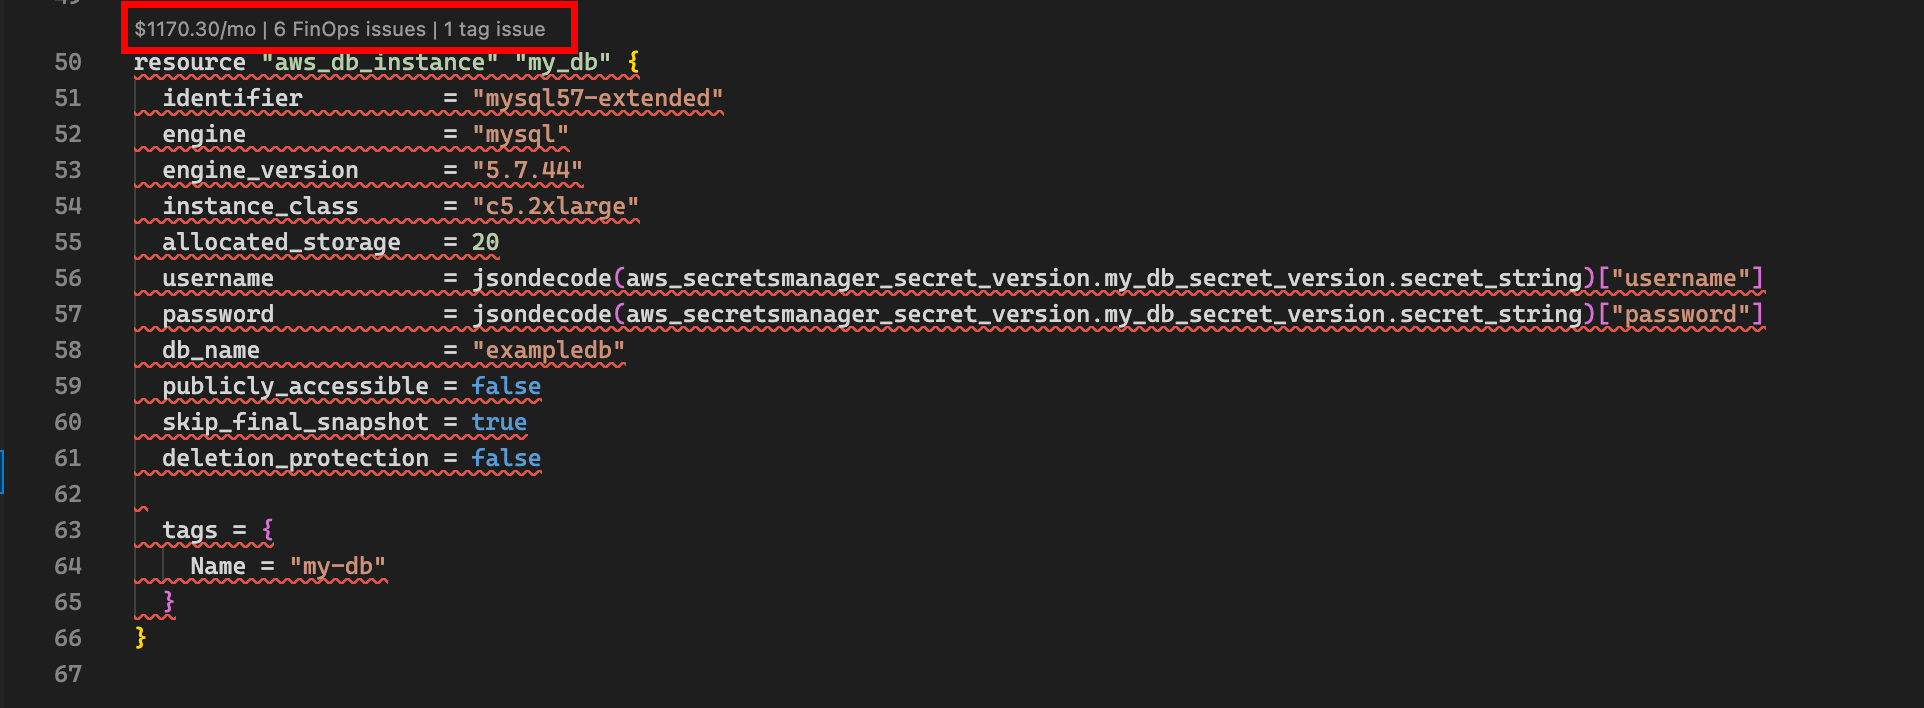
See inline cloud cost estimates, FinOps policy violations, and tagging issues directly in your editor as you write Terraform or CloudFormation — before anything reaches a pull request.
Once installed, log in to Infracost from the extension sidebar. The language server will start scanning your workspace, and cost estimates will appear as code lenses above each resource block. Click any code lens to see the full cost breakdown, policy violations, and tagging issues for that resource.
The install steps are only necessary if you didn't allow infracost setup to configure your
IDE, if you are enabling it for IDEs that are not supported by infracost setup, or if you prefer
to configure things yourself.
Choose your editor to see installation instructions:
- VS Code
- Cursor
- Windsurf
- JetBrains
- Antigravity
- VSCodium
- Eclipse Theia
- Neovim
- Zed
Requires VS Code v1.75.0 or above.
Open VS Code and go to the Extensions view (Ctrl+Shift+X / Cmd+Shift+X). Search for Infracost, select the extension published by Infracost, and click Install.
Alternatively, use the Quick Open command:
ext install Infracost.infracost
The extension is also listed in the Visual Studio Marketplace and on Open VSX.
Installing a pre-release version
Pre-release builds are published as .vsix files on the vscode-infracost releases page. Download the build for your platform, then install it either from the command line:
code --install-extension infracost-<version>-<platform>.vsix
…or from inside VS Code: open the Command Palette (Cmd+Shift+P / Ctrl+Shift+P), run Extensions: Install from VSIX…, and select the downloaded file.
Open the Extensions panel (Ctrl+Shift+X / Cmd+Shift+X), search for Infracost, and click Install.
Open the Extensions panel (Ctrl+Shift+X / Cmd+Shift+X), search for Infracost, and click Install.
The Infracost plugin for JetBrains is available for IntelliJ IDEA, GoLand, WebStorm, PyCharm, PhpStorm, Rider, and any other IDE on the IntelliJ platform.
- Open your JetBrains IDE and go to Settings / Preferences > Plugins.
- Select the Marketplace tab and search for Infracost.
- Click Install and restart the IDE when prompted.
Note: If your IDE cannot reach the internet, download the plugin
.zipfrom the JetBrains Plugin Marketplace and install it via Settings / Preferences > Plugins > ⚙️ > Install Plugin from Disk…
Open the Extensions panel, search for Infracost, and click Install.
Open the Extensions panel (Ctrl+Shift+X / Cmd+Shift+X), search for Infracost, and click Install. VSCodium uses the Open VSX Registry, where the Infracost extension is published.
Open the Extensions view via View > Extensions, search for Infracost, and click Install. Theia sources extensions from the Open VSX Registry.
Note: The available extension API version varies by Theia release. The Open VSX Registry surfaces the most compatible version automatically. If you need to install manually, use Extensions: Install from VSIX… in the command palette.
Add the Infracost plugin to your Neovim config by following the instructions from the GitHub repository.
The Infracost extension is availale in Zed
- Open Zed and navigate to the Extensions view from the main Zed menu
- Search or Infracost
- Click Install
See the IDE Extensions page for login instructions, editor commands, and more details.
CLI
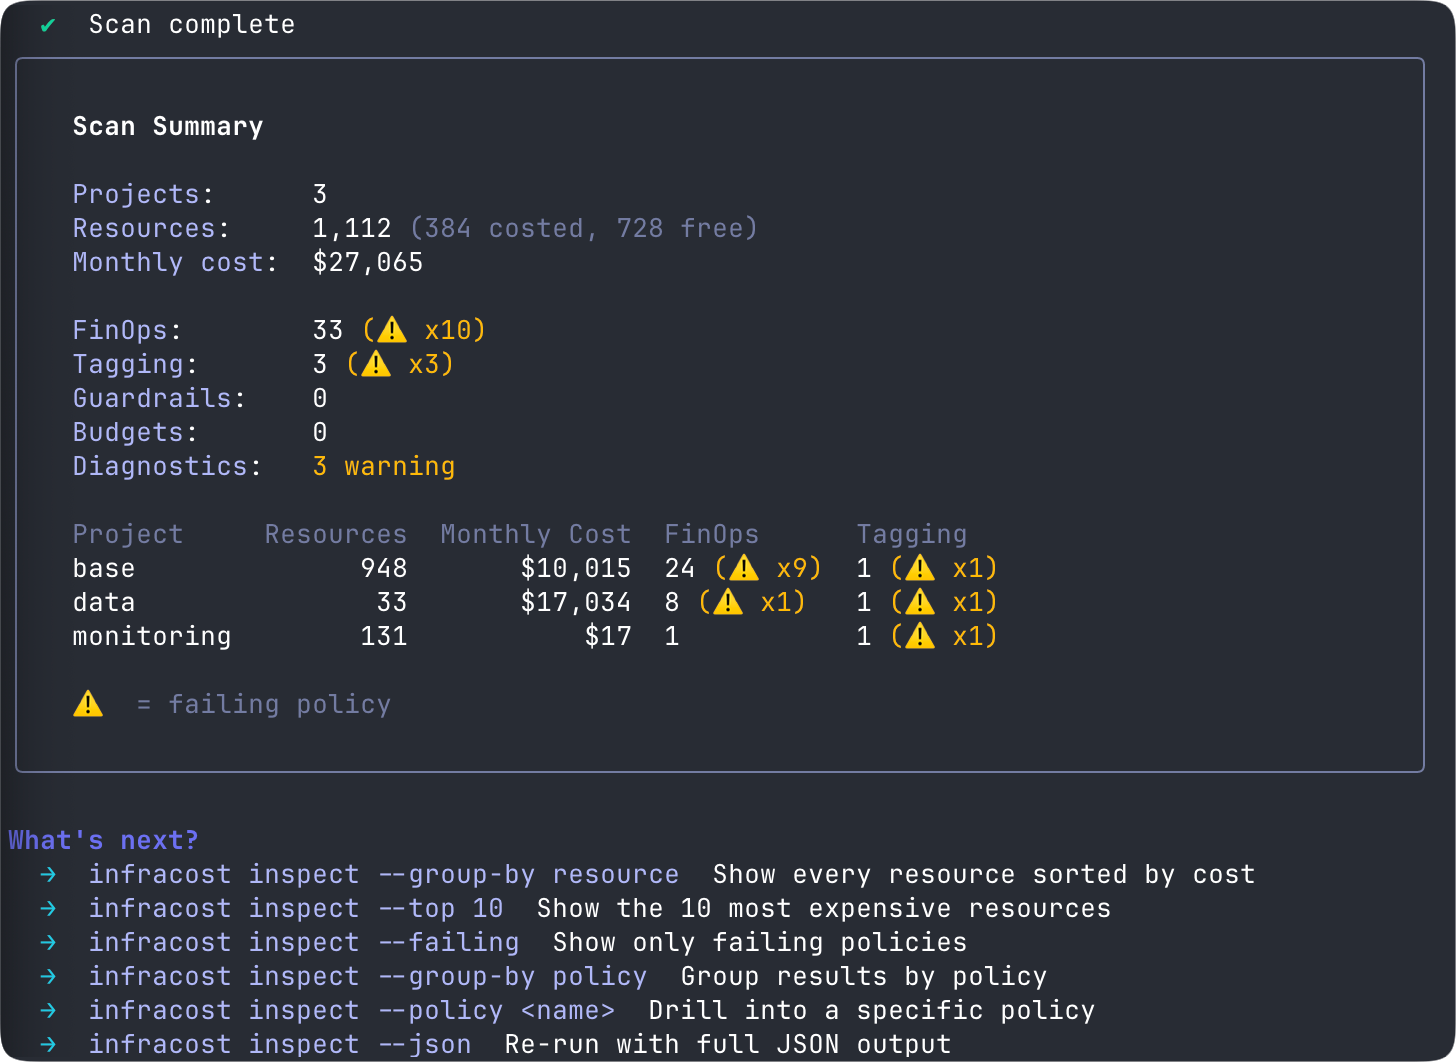
Run a scan from the project root:
infracost scan
You'll get a full cost breakdown of every resource, flagged FinOps policy violations, and tagging issues — right in your terminal.
CI/CD
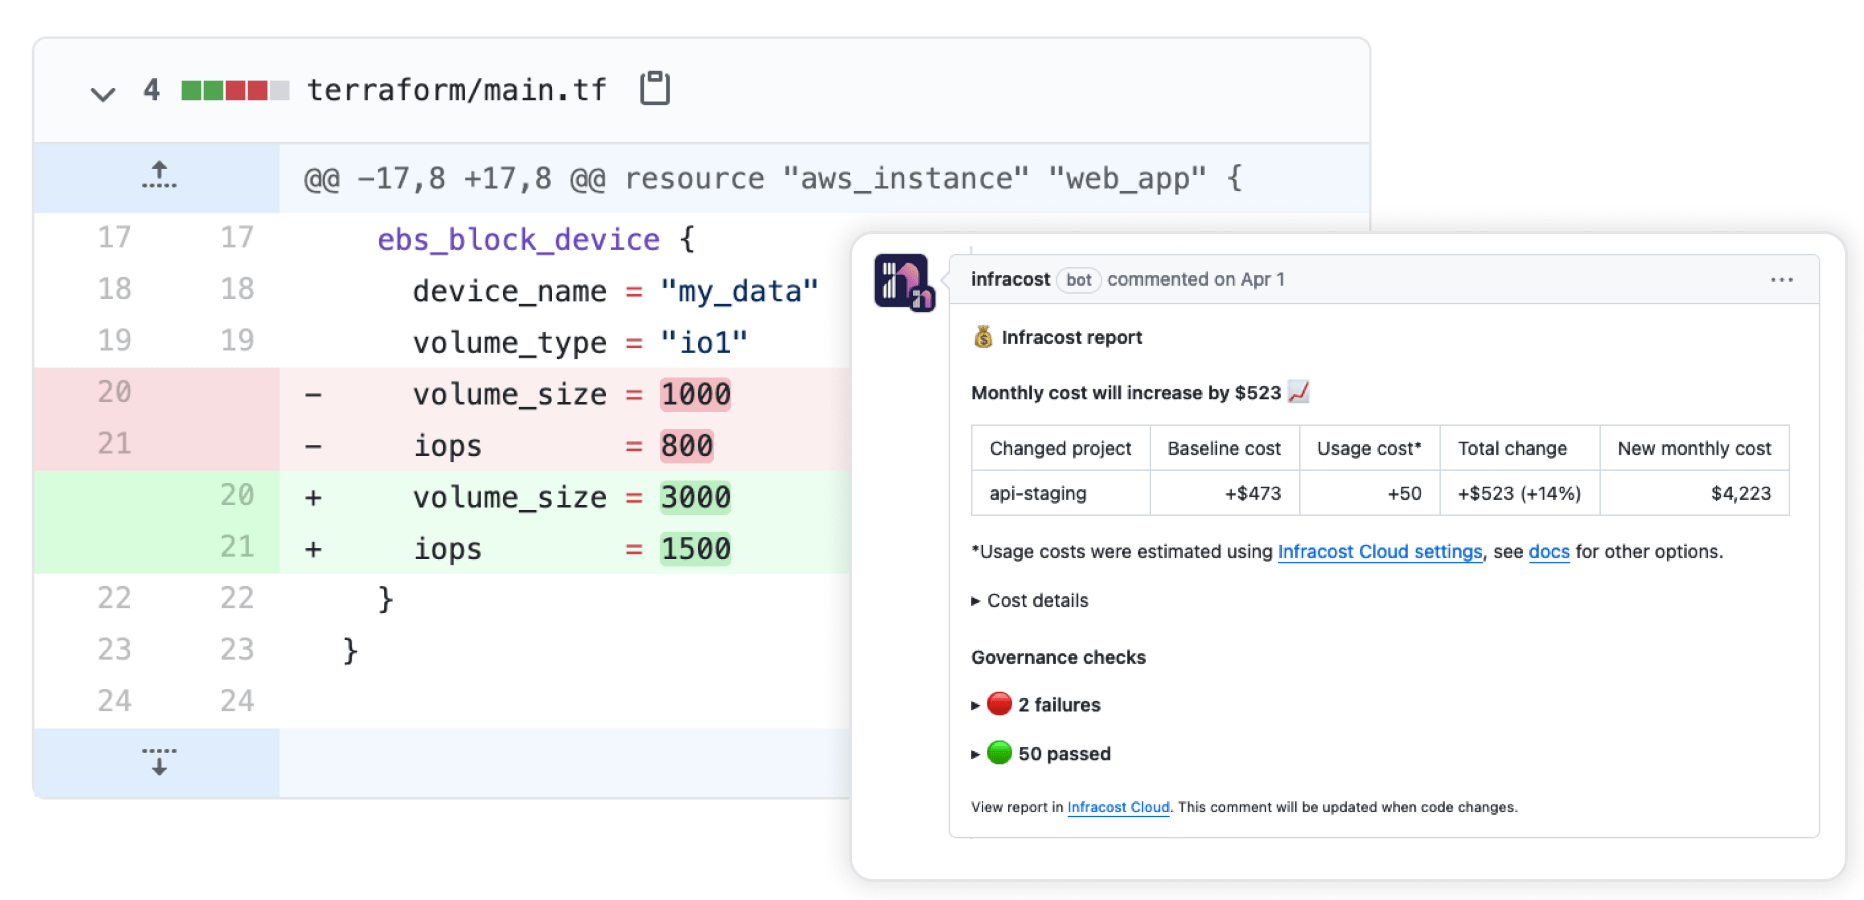
Add Infracost to your pull requests to give your team a safety net — every PR gets an automatic comment showing the cost diff, FinOps policy violations, and tagging issues introduced by the change, so cost impact gets discussed alongside the code review. It only takes 15 minutes! See our demo video to learn more.
See our CI/CD integration guides for step-by-step instructions for GitHub Actions, GitLab CI, Azure DevOps, and more.